Asset Gallery Documentation
This plugin provides a custom field type called "Asset Gallery." This field type allows users to upload multiple files at once and associate them with not just a single blog post, but also a single field within that post.
This plugin makes it easy for designers to create photo galleries embedded inside of a blog post.
This plugin was originally developed by Six Apart, but has since fallen into disrepair. Endevver has taken on responsibility for maintaining this plugin and has greatly enhanced its capabilities.
Prerequisites
- Movable Type Pro
Installation
To install this plugin follow the instructions found here:
http://tinyurl.com/easy-plugin-install
Setup & Usage
To use this plugin you will need to do three things:
- Install it obviously.
- Setup your templates so that when a post includes a gallery you have some means of showing your slideshow.
- Create a custom field and begin uploading files.
The instructions below should help you through that process.
About Asset Gallery's Template Tags
When you define a custom field of type asset gallery, Movable Type will prompt you for a tag name. This tag name will refer to a comma delimited list of asset IDs (the contents of your slideshow). To help you iterate over that list, two other template tags will be defined for you based upon the template tag you specify with your custom field. Let's look at an example.
Let's say you defined a custom field of type "Asset Gallery" with a tag name of "MySlideshow" like so:
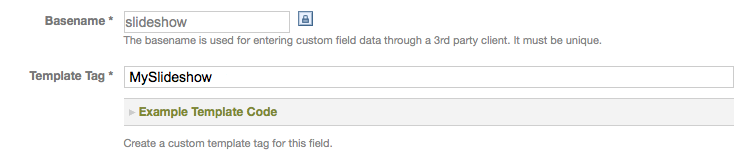
If in your template code you used this tag, e.g. <$mt:MySlideshow$>, it would output something like this:
10,34,923,213,424
This apparently random value is an ordered list of asset IDs representing the assets that comprise the slideshow. This however is not very useful to most users. So to assist designers two template tags are created for you automatically to help navigate and iterate over the list more effectively. The names for these tags are based upon the tag name you chose. For example:
<mt:MySlideshowAssets></mt:MySlideshowAssets>- a container tag that will loop over each photo in the slideshow in order.<$mt:MySlideshowAssetCount$>- a function tag that returns the total number of slides in the slideshow.
Updating the Sample Code Provided
The Asset Gallery plugin comes with a global template module that is installed for you automatically. However, it assumes that the template tag you assigned to your custom field is Slideshow. Chances are you chose a different template tag name in which case you might be getting an error like "SlideshowAssetCount is unrecognized":

An error like this is fixed by updating the template module provided with the template tag names you chose. So let's suppose the template tag you chose was "MySuperGallery," then what you would need to do is search and replace for the following strings:
- Replace "SlideshowAssetCount" with "MySuperGalleryAssetCount"
- Replace "SlideshowAssets" with "MySuperGalleryAssets"
Installing the Templates
When you installed the Asset Gallery plugin a global template module called "Asset Gallery Slideshow" was created for you automatically. The next step is to display the gallery in a post if that post contains a gallery. This is done with this template code, supposing that the template tag name you gave your custom field was "Slideshow":
<mt:if tag="SlideshowAssetCount" gt="0">
<div id="slideshow" class="entry-content more">
  <$mt:include module="Asset Gallery Slideshow"$>
</div>
</mt:if>
We suggest placing the slideshow in your Entry archive template right after your extended body (at the end of the post). But you can put it anywhere obviously.
Setting up the Javascript and CSS
Now that the slideshow will render to the page you need to add the javascript and CSS to make it all work and look purdy.
Add this section somewhere inbetween <head> and </head>:
<mt:if tag="SlideshowAssetCount" gt="0">
<link rel="stylesheet" href="<$mt:StaticWebPath$>plugins/AssetGallery/blog/slideshow.css" type="text/css" />
<link rel="stylesheet" href="<$mt:StaticWebPath$>plugins/AssetGallery/blog/jquery.jcarousel.css" type="text/css" />
<script src="<$mt:StaticWebPath$>jquery/jquery.js" type="text/javascript"></script>
<script src="<$mt:StaticWebPath$>plugins/AssetGallery/blog/jquery.jcarousel.pack.js" type="text/javascript"></script>
<script src="<$mt:StaticWebPath$>plugins/AssetGallery/blog/slideshow.js" type="text/javascript"></script>
</mt:if>
Tip: this is wrapped in an <mt:if> block so that we only load all the
css and javascript if a slideshow is present. This helps speed up page download
and render time.
Create a Gallery/Slideshow
To use the Asset Gallery plugin you will need to first create a custom field of the type "Asset Gallery" in the blog you want to begin using galleries within. Then navigate to the Edit Entry screen and click "Display Options" and make sure your custom field is visible on the page. Click "OK" to close Display Options.
Once the custom field is visible, you can begin uploading photos immediately. Upload as many as you want and then save the entry. When you are returned to the Edit Entry screen the gallery custom field will now show a list of all the photos you uploaded. You can then:
- reorder the slides in the gallery by dragging and dropping them
- rename the slides and give them captions right there in the custom field
- upload more slides
- delete slides
When you are complete, click "Save and Publish" and see your finished product!
Bug Reports
You can file bug reports here:
License
This plugin is licensed under the GPLv2.